|
|
|
Migrating data from InterSystems Cache to SQL Server
This guide will show you how to easily migrate data from InterSystems Cache to SQL Server through a few simple steps with ESF Database Migration Toolkit, simplifying the complex migration processes and saving you valuable time.
Software Required:
| DMToolkit_x64.zip (63.6 MiB) |
64-bit Windows application for ESF Database Migration Toolkit 11.2.28 (2024-04-10). (md5: 593585974b19d6ccaf649b1dbe8996a1) |
| DMToolkit_win32.zip (58.8 MiB) |
32-bit Windows application for ESF Database Migration Toolkit 11.2.28 (2024-04-10). (md5: e073a088d3b711757b6a0ab3fa94520d) |
System Supported:
- Windows 7 or higher.
- InterSystems Cache 2015.1 or higher.
- SQL Server 6.5 or higher.
Introduction:
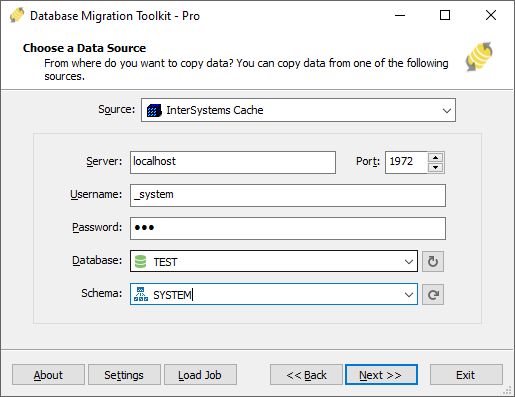
1. In "Choose a Data Source" dialog, choose "InterSystems Cache";
- Enter the server name (the default is localhost) and the port number (the default is 1972).
- Enter the username (the default is "_system") and its associated password.
- Click the "Refresh Database" button to display a list of all databases, then select an existing database.
- Click the "Refresh Schema" button to display a list of all schemas, then select an existing schema.
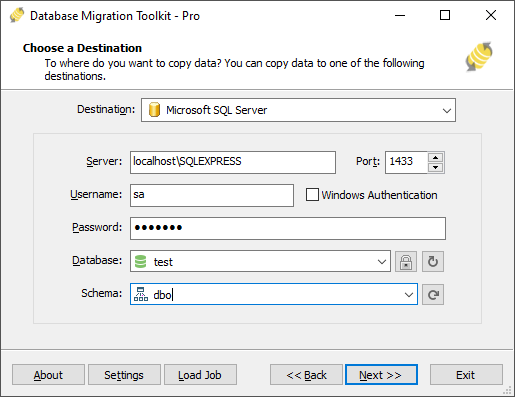
2. In "Choose a Destination" dialog, choose "Microsoft SQL Server";
- Input the SQL Server host name (you can also add an instance name). e.g: localhost\sqlexpress.
- If using TCP/IP method then input the server port (default is 0 and using pipe method), in addition, you need to provide a username(e.g: sa) and password.
- Check the "Windows Authentication" checkbox if using Windows authentication.
- Press the "Refresh Database" button to list all databases. You can either select an existing database or enter a new database name. This toolkit will automatically create the new database during the migration process.
- Press the "Refresh Schema" button to list all schemas. You can select an existing schema or enter a new schema name. This toolkit will automatically create the new schema during the migration process. If you leave it empty, the default is "dbo".
3.In "Select source Tables(s) & View(s)" dialog;
- Select the tables or views you want to migrate.
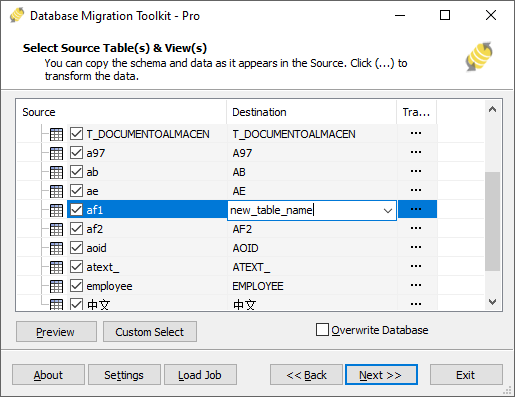
- You can access the table options or adjust the table structure by clicking the "..." button.
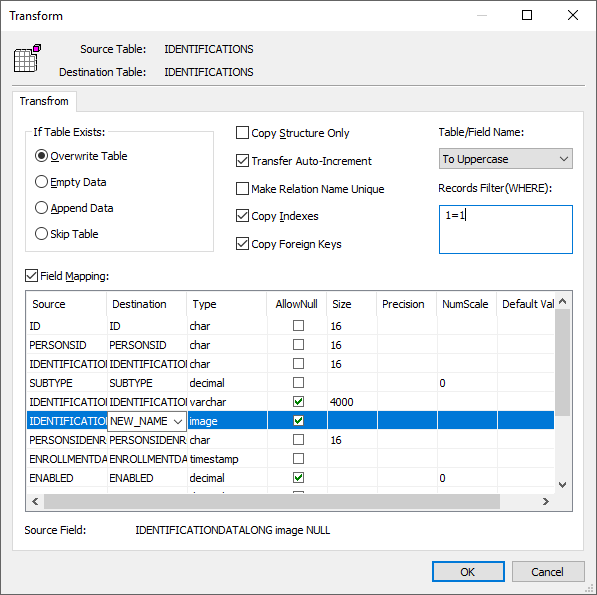
- In the "Field Mapping" option, you can customize the destination table's fields, such as field name, data type, default value, comment, and more. You also have the option to choose the data transfer method, including Overwrite Table, Empty Data, Append Data, or Skip Table, or even filter the data before transferring it.
4. In "Execution" Dialog;
- You can start the migration process by clicking "Submit". The toolkit will efficiently and seamlessly migrate your data from InterSystems Cache to SQL Server without the need for manual intervention.
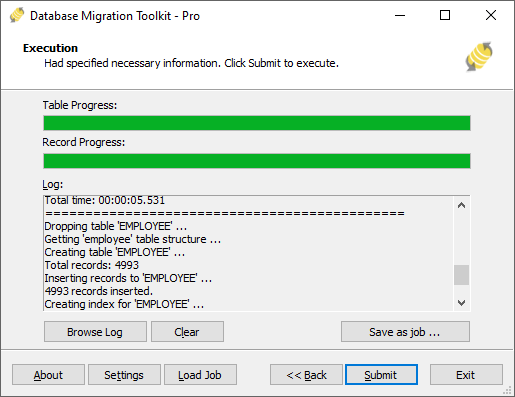
- To keep track of the migration process, you can access the full migration log by clicking "Browse Log". This will provide you with a comprehensive view of the entire migration, including any potential issues and their resolutions.
- To save time in the future, you can save the migration settings as a job file by clicking "Save as job". This allows you to quickly reload the migration job at a later time or run the migration job using the command-prompt by typing "dmtc.exe --help". The command-prompt provides you with a full list of parameters to customize the migration process to your specific needs.
5.Finished!
Upon completion, the toolkit will generate a comprehensive migration report, providing you with all the information you need to verify the accuracy and completeness of the migration process. So, you can sit back and relax while the program carries out the task efficiently. Should you have any inquiries or recommendations, don't hesitate to reach out to us. We're always happy to help.